Elm327 Obdii Obd2 Wifi adapters offer a convenient way to monitor your car’s performance and diagnose issues. This guide provides a step-by-step approach to connecting your adapter to your vehicle and setting up the Car Scanner app.
An ELM327 OBDII OBD2 WiFi adapter plugs into your car’s OBDII port, usually located under the dashboard. Before starting, ensure your adapter has a WiFi connection and insert it into the OBDII socket. Turn the ignition on or start the engine. If your adapter has a power button, press it.
Connecting to the Adapter’s WiFi Network
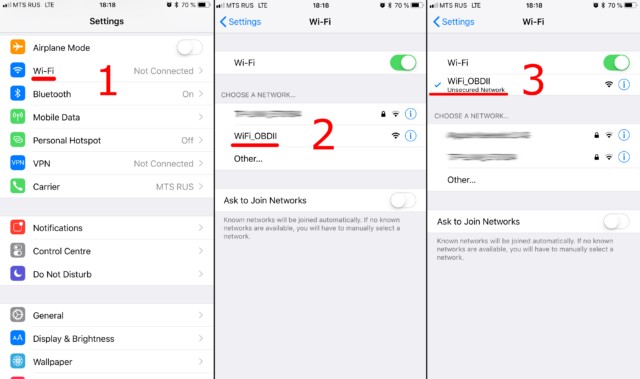
First, open your phone or tablet’s WiFi settings. Find the network broadcasted by your ELM327 adapter. Common names include “OBDII,” “OBD2,” “WIFI_OBDII,” or variations incorporating the adapter’s brand, like “VLINK” for VGate adapters. Note that the network name will not reflect your car’s brand. Most adapters don’t require a password, but consult your adapter’s documentation if needed.
Configuring the Car Scanner App
Next, open the Car Scanner app and navigate to Settings (gear icon in the top right corner).
Select “Adapter” (or “Connection” in older versions).
Choose “Wi-Fi” as the connection type.
Verifying Adapter Settings
Confirm the adapter’s IP address and port are correct. The default IP address is usually 192.168.0.10, and the port is 35000. However, these settings may vary depending on the adapter model. Refer to your adapter’s documentation for specific information.
Establishing Connection
Once the settings are verified, tap the green “Connect” button.
Subsequent connections only require ensuring you’re connected to the OBD2 WiFi network and tapping “Connect.” With these steps completed, your elm327 obdii obd2 wifi adapter is ready to provide valuable insights into your vehicle’s health.
