Building your own OBD2 to USB tuning cable can save you a significant amount of money compared to buying a pre-made one. This guide provides a step-by-step approach to crafting your own cable, perfect for motorcycle enthusiasts and DIY tuners. This project utilizes readily available components and basic soldering skills.
Sourcing the Necessary Components
The core components for this DIY project include:
- OBD2 Cable: A standard OBD2 cable with exposed wires for connection. A suitable option can be found on OBD2Cables.com ([link removed as per instructions]( ). Ensure the cable has individually accessible wires for modification.
- 6-Way Plug: A 6-way connector that will plug into your motorcycle’s diagnostic port. Corsa-Technic offers a compatible connector ([link removed as per instructions]( ).
- FTDI Chip: An FTDI FT232RL chip acts as the interface between the OBD2 cable and your computer’s USB port. This chip handles the conversion of data signals. These are readily available online through various vendors like eBay ([link removed as per instructions]( ).
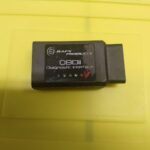
Assembled components for the OBD2 to USB tuning cable project.
Wiring the OBD2 to USB Cable
Referencing wiring diagrams is crucial for success. The TuneECU website ([link removed as per instructions]( )) provides a wiring diagram specifically for KTM motorcycles, showing the correct pinout for the 6-way connector.
Wiring diagram illustrating the connection points for a KTM motorcycle.
However, wire colors may vary between OBD2 cables. Consult the pinout diagram provided by your OBD2 cable supplier to ensure accurate connections. Using a multimeter to confirm continuity is a recommended practice.
Example pinout diagram showcasing wire color codes and corresponding pin numbers.
Using a multimeter to verify the correct wire connections for the OBD2 cable.
Assembling the Cable
Once the wires are identified, attach the connectors to the wires from the OBD2 cable. Crimp the connectors securely and solder them for a robust connection. Apply heat shrink tubing to insulate and protect the soldered connections.
Close-up of the crimped and soldered connections before applying heat shrink tubing.
Carefully insert each wire into the corresponding slot in the 6-way plug, ensuring proper orientation. You should hear a click when the connector is fully seated. Trim any excess wire and apply heat shrink tubing to the entire plug for a clean and professional finish.
The finished DIY OBD2 to USB tuning cable, ready for use.
Conclusion
Building your own Diy Obd2 To Usb Tuning Cable is a cost-effective solution for motorcycle tuning and diagnostics. By following these steps and utilizing readily available resources, you can save money and gain a deeper understanding of your motorcycle’s electronics. This project empowers you to take control of your tuning process without breaking the bank.