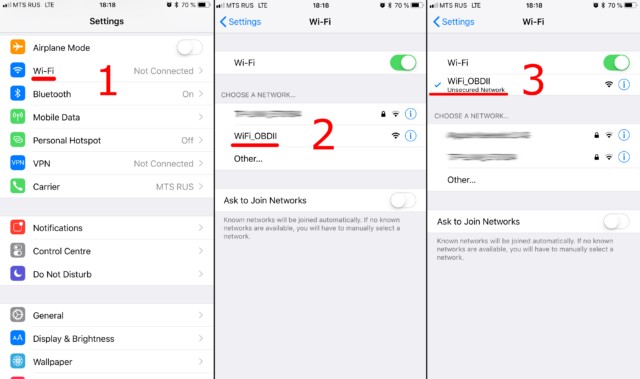
First, ensure you have an OBDII ELM327 adapter with Wi-Fi. Plug it into your car’s OBDII port and turn the ignition on or start the engine. If your adapter has a power button, press it.
Connecting to Your OBD2 Adapter’s WiFi Network
Step 1: Access Wi-Fi Settings. Open your phone or tablet’s Wi-Fi settings (not the Car Scanner app) and enable Wi-Fi.
Step 2: Locate and Connect to the Adapter. Find the Wi-Fi network broadcasted by your ELM327 adapter. Common names include “OBDII,” “OBD2,” “WIFI_OBDII,” or variations. The name might also relate to the adapter brand (e.g., “VLINK” for VGate adapters).
Step 3: Enter Password (If Required). Most adapters don’t require a Wi-Fi password. If yours does, consult the adapter’s documentation. Note: The network name will never be your car’s brand.
Configuring the Car Scanner App
Step 1: Open Car Scanner and Access Settings. Launch the Car Scanner app and navigate to Settings (gear icon in the top-right corner).
Step 2: Select “Adapter” Settings. Tap on “Adapter” (or “Connection” in older versions).
Step 3: Choose Wi-Fi Connection Type. Select “Wi-Fi” as the connection type.
Step 4: Verify IP Address and Port. Confirm the correct adapter IP address and port. The default for most is 192.168.0.10 for the IP address and 35000 for the port. Refer to your adapter’s documentation if these differ.
Establishing Connection
Step 1: Initiate Connection. Tap the green “Connect” button.
Step 2: Future Connections. For subsequent connections, ensure you’re connected to the OBD2 Wi-Fi network and simply tap “Connect.”
Successfully setting up your OBD2 ELM WiFi adapter allows you to diagnose and monitor your vehicle’s performance using the Car Scanner app. Ensure accurate configuration for seamless connectivity and data retrieval.
